Friday, December 14, 2012

Nightmare Lesson

On 11/ 30 Jen and  Megan taught their lesson on nightmares. We came into the classroom and the lights were dim. There was a screen in the center of the classroom and we were welcomed by a shadow puppet show about a giant and a bird. I think this was a wonderful introduction to the lesson, it instantly got students excited to make their own puppet. The teachers then went on to tell us that they made these puppets based on nightmares they had had. They also explained that even though these were frightening for them as children, making a story about the characters and creating these puppets helped them get over their fears. Jen and Megan showed the class several examples of artists who use puppets including Brian Froud. The showed us a clip from Americas Got Talent a routine from dancers called The Silhouette's; they also showed us some examples of Javanese Puppets. I really enjoyed these artist examples especially the Silhouette's, these examples conveyed the ideas they wanted the class to understand accurately.

The video


Jen and Meagan gave a demo on how to make puppets they told us that it was important to concentrate on the overall shape of the figure and not to get to caught up in details because most details wont show up in shadow form. We were told we must use at least in hinge to create a join on our puppet. They asked the class for examples joints or hinges. Some students mentioned elbows and knees.Then they recaped that yes we can create joints for our wrists ,arms, legs, feet ext..
Great lesson every one was so caught up in making their puppet. Everyone seemed to want to finnish and do the next step of creating a show.


Body Lesson

On December 4th Justin and Victoria presented their lesson on the body. They introduced the class to the artwork of Judith Braun.


Braun uses her finger tips to create drawings she calls "fingerings".


This artist was a good introduction to what we would be doing. Justin and Victoria
gave a demo on ways to draw with our finger tips. They also had us line up next to a line with a peer on the opposite side of the line. One side of the line was asked to make a gesture and the other side to mimic the gesture. Victoria and Justin then explained how they just created symmetry. I found this was a great way to get the class excited and involved in the lesson. I definitely will try using this activity in a future lesson.  Then we received a piece of black paper, white paper, chalk and black graphite. We we asked to draw on one piece of paper then  mimic the drawing on the other to create a symmetrical piece of artwork. One problem I found was that I naturally wanted to use both my hands but I tried to refrain from doing that because we were told not to. I think it would have been a richer learning experience if we were encourage to try both ways. Overall such a great lesson. It was lots of fun and plenty of opportunities for experimenting with materials and artistic growth.

Literary Sculpture Lesson

On November 20th Mikaela and Laura taught their lesson on literary sculptures. They had each student choose a book then use additive and subtractive processes to transform the book. They told the class they could use a line from the book to illustrate, they could take something from the overall idea or the title of the book. I thought this was a great lesson but one suggestion could be to give the class more objects and supplies to add to the book. Plus while cutting out an image and folding it upwards is a transformative process it is not additive or subtractive so to resolve this issue they could have not required the class to add or subtract from the book or on the other had make it a requirement and show in your demo ways to add and subtract.

Here are the teachers samples that were shown to the class.


Appropriation

 Appropriation is the artistic practice or technique of reworking images from well-known paintings, photographs, etc., in one's own work.

Artists who use appropriation

Andy Warhol


"Marilyn" by Andy Warhol


Marcel Duchamp


L.H.O.O.Q by Marcel Duchamp
 
Duchamp used aproppriation by taking  Leonardo da Vinci's Mona Lisa and putting a mustache on her. In this way he directly turns the image into an androgenous looking figure.
 
Robert Colesscott
 
Left: Robert Colesscott, Les Demoiselles d’Alabama, 19855; Right: Pablo Picasso, Les Demoiselles d’Avignon, 19076Les Demoiselles d'Alabama & Les Demoiselles d'Avignon


Romare Beardon


Mark Making Lesson

On November 11th Taryn and Amanda taught their lesson on Mark making we were introduced to artists Zemer Peled, Ushio Shinohara, and Wiliam Anastasi.


Zemer Peled, Throwing clay aginst Wall 2012

some other artworks by this artist


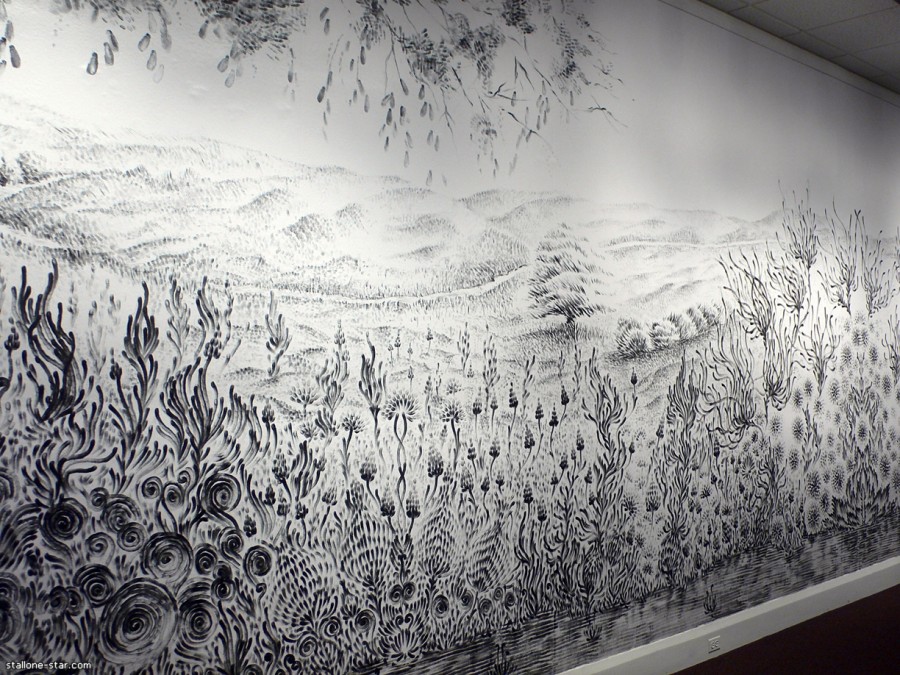
I liked that Amanda an Taryn introduced the class to these artists who have a spontaneous and unpredictable method of making art. Their lesson was very similar to Zemer Peled's Throwing clay against Wall 2012. We were all given three pieces of clay. There was a table in the middle of the classroom, the table had many different organic objects including rocks, bark, leaves, roots ect.. We were told to take one object and make impressions of our objects into the clay as well as make one impression using our hands or a clay tool. They told us not to get attached to these creations. I think this assured the class that their was no pressure to create a magnificent piece of artwork. Taryn and Amanda had a huge sheet of white paper taped to the ground. After about 5 mins, they asked us to come gather around the sheet of paper. We were all told to throw the clay at the paper. After we all threw the clay Amanda and Taryn noticed a problem, not everyone's clay stuck to the paper. So Amanda encouraged everyone to spray the clay the next time around.I thought this was great improvising on their part! We threw the second then the third piece of clay.During the project Taryn reminded us to pay attention to the composition of the artwork, if one spot was empty we might want to fill it with clay to keep the composition balanced. I thought it was great that they guided us in the creation process while teaching us terms like composition,balance and texture. At the end we all talked about the artwork. Taryn pointed out how the clay represents positive space and the white paper represents negative space. Some students noted that the color of the floor was cohesive with the clay color and added to the artwork. Amanda and Taryn had a viewfinder that they drooped on the artwork. It randomly drooped and then we talked about the composition the viewfinder set up. They gave a few students a turn to drop the viewfinder. This lesson is an excellent way to have some fun and learn at the same time. Throwing the clay was such a release of tension and as college students we all need to find ways to do this. Great job Amanda and Taryn! Think I'm going to go throw some clay now!!!

Bloom's Taxonomy


http://www.cbv.ns.ca/sstudies/links/learn/1414.html

Key words to keep in mind

Remembering: can the student recall or remember the information?
  • define
  • duplicate
  • list
  • memorize
  • recall
  • repeat
  • reproduce
  • state
Understanding: can the student explain ideas or concepts?
  • classify
  • describe
  • discuss
  • explain
  • identify
  • locate
  • recognize
  • report
  • select
  • translate
  • paraphrase
Applying: can the student use the information in a new way?
  • choose
  • demonstrate
  • dramatize
  • employ
  • illustrate
  • interpret
  • operate
  • schedule
  • sketch
  • solve
  • use
  • write
Analyzing: can the student distinguish between the different parts?
  • appraise
  • compare
  • contrast
  • criticize
  • differentiate
  • discriminate
  • distinguish
  • examine
  • experiment
  • question
  • test
Evaluating: can the student justify a stand or decision?
  • appraise
  • argue
  • defend
  • judge
  • select
  • support
  • value
  • evaluate
Creating: can the student create new product or point of view?
  • assemble
  • construct
  • create
  • design
  • develop
  • formulate
  • write

Juxtaposition

What is Juxtaposition?

Juxtaposition means placing things side-by-side. In art this usually is done with the intention of bringing out a specific quality or creating an effect, particularly when two contrasting or opposing elements are used. The viewer's attention is drawn to the similarities or differences between the elements.

 Some well known artists who use juxtaposition are  Salvador Dali, Damien Hirst and Frida Kahlo (among many more).


The Two Fridas, 1939, Oil on canvas, 67" x 67" by Frida Kahlo

Frida Kahlo uses juxtaposition to contrast two sides of her personality
.The Frida on the left represents her more traditional self. Dressed in traditional Mexican clothes she is the weaker of the two the one that her former husband Diego Rivera has rejected. The woman on the right represents a strong and independent Frida , who looks over and protects the traditional Frida.

hirst
Damien Hirst Diamond Skull

Diamond Skull- Through his choice of materials Hirst contrasts two extreme opposites. Hirst symbolizes  mortality with the use of a skull and eternity with the use of diamonds.


While researching I stumbled upon the artwork of Leslie Holt

hello-goya-web.jpg
Hello Goya 2006 oil on canvas 4x6"

Holt contrasts Goya's The shooting of May 3 1808 with a hello kitty doll. The Goya painting depicts a horrific event of terror and death, the hello kitty doll represents a sense of  innocence and virtue.This contrast between a heartless massacre and childhood innocence represents the implementation of juxtaposition in art.


Wednesday, December 12, 2012

Narrative Lesson

November 13 2012
Cindy Sherman's Untitled Film Still #21
                                                                         Untitled #96
Cindy Sherman, Untitled #92, 1981
 
Jamie and Kirstin taught their lesson on narrative. They showed a PowerPoint on Cindy Sherman and asked us questions like what do you see? and What do you think that piece of paper is? Who is this woman? I think the questions encouraged the class to make up their on stories (narrative) about the woman in these photos. One student started talking about how the women in the photograph looks like she could be on desperate housewives, the photo is so filled of drama. They talked about genre and asked the class what type of genre these photos would fit into.The class replied drama or mystery. The photo Untitled #92 was given to us in the form of a worksheet. There was one box above the photo and one box bellow. We were asked to draw a narrative depicting what had happened to this woman before and after. I think this exercise was a great way to get the class thinking about putting a story together in a sequential manner. Kirstin also showed a demo on camera angles and we were told to think about what angle we wanted to shoot our photos at. For this project we used digital cameras to take a picture that tells a story, we were also asked to think of a genre for our photo. We had the option to make props for our photo. To start we were given a page to draw out an idea for a photograph. At this moment I froze up. For some reason I just couldn't jump right into this project. I couldn't think of any ideas do I just drew a picture of me kneeling on the ground looking frightened at something. To think of it it looks very similar to Cindy Sherman's Untitled #92. For this project my idea was not very original, but I think a few things could have helped. When I was drawing I desperately wanted more boxes on the paper so I could mess around with a few ideas, this way I wouldn't be tied to just one. I think it would have been helpful to be given random words describing a subject or verb that our narratives must include. Even if it was just one word I feel like that alone would have helped me generate some ideas. We worked with a partner who took our picture but the two narratives did not correspond. I think the lesson would have been more engaging if we worked with our partners in concept as well as production. Overall great job Kirstin and Jamie.


Here are a couple of  Cindy Sherman self portraits I found appealing.


Quote from Artist
 
Cindy Sherman

Insanity Lesson


November 9th - Tanya and Katie taught their lesson on the theme of insanity. I think their theme is attention grabbing and exciting. I was engaged from the start. We were given a packet titled Repetitious Compulsions and told that we should fill out this packet out during the PowerPoint. They started with asking the class what the word insanity means. When students started to call out (crazy, wide eyed etc...) they wrote the words on the smart board. I was glad we talked about the artist Judith Scott. We had just talked about her in my disability studies in art education class and this was a nice connection for me. Judith Scott has Down syndrome, is deaf and cannot speak her way of communicating to the world is through her art. Judith was put into an institution for 35 years and her artistic abilities didn’t start to emerge until she was taken out of the institution by her twin sister. She often finds objects and she wraps them with colorful string, over and over again until they lose all utilitarian purposes. These objects can now be appreciated for their artistic and aesthetic function.
 
                                                     Curlicue Sculpture, Judith Scott
                                         
 
After the Power Point we all got a box the boxes all contained different types of materials. Each group got a verb something they would have to implement in the making of their project. My group got cupcake wrappers pins and glue. Tanya and Katie gave us small pieces of foam board to practice on. After we experimented on the practice board we could then move to the larger piece of foam board. I really loved how fun and creative this project was. Plus their was an element of surprise with the boxes and choosing of techniques. I also think that Tanya and Katie did a great job of staying consistent with their theme of insanity. Our materials and the verbs encouraged students to use  repetition. The actions of stacking and wrapping and pinning  over and over again represents the compulsive actions of the artists Judith Scott, Eva Hesse and Tara Donovan. It was very helpful to have a verb we must use, it narrowed down the possibilities and this way we could concentrate  one repetitive action. I enjoyed the critique at the end it was nice to see what everyone else had done and what materials and verbs they had. Some groups had clay, some had wire, and some had cardboard.